If you only make one thing this weekend, it should be this homemade lemonade recipe.

If you only make one thing this weekend, it should be this homemade lem
Entertaining pros know that summer get-togethers call for refreshing cocktails to help you cool down. And while lemonade may seem juvenile, Julia Reed’s vodka-infused lavender mint rendition on the classic drink will have you convinced otherwise. And, of course, “You can leave out the booze for toddlers and teetotalers,” she advises. This recipe, from Julia Reed’s Southis just begging to be sipped on a porch this summer.
 
Serves 8–10
1 cup lavender sugar
8 ½ cups water
1 bunch mint, plus more for garnish
Juice of 4 lemons, plus lemon slices for garnish
1 ¼ cups vodka
Fresh lavender sprigs for garnish
Combine the lavender sugar and ½ cup water in a small saucepan. Bring to a boil over medium heat and cook until the sugar has dissolved—do not let the mixture color. Remove from the heat and submerge the mint in the mixture. When the mixture has cooled, strain it through a fine-mesh strainer into a large pitcher. (If your sugar contains lavender flowers, line the strainer with cheesecloth.) Add enough ice to fill the pitcher halfway, along with the remaining 8 cups water, lemon juice, and vodka, and stir. Pour into glasses and garnish with a lemon slice and a sprig each of lavender and mint. 


Easy Garlic Bread recipe


Easy Garlic Bread
 Total Time: 15 min
Prep: 5 min
Cook: 10 min
Yield: 6 servings
Level: Easy
Ingredients

4 tablespoons butter, softened
One 12-ounce loaf French bread, cut into 1-inch slices
2 teaspoons dried parsley
1/2 teaspoon garlic powder

Directions
Preheat a grill pan over medium-high heat.
Spread the butter on both sides of the bread and season with the parsley and garlic powder. Place on the grill pan and cook on one side until golden brown. Flip, and continue cooking until other side is golden brown. Remove and serve.
Recipe courtesy of Paula Deen

most wanted Herbed Garlic Bread recipe

 Herbed Garlic Bread
Total Time: 25 min
Prep: 5 min
Cook: 20 min
Level: Easy


Directions
Slice a loaf of Italian bread, stopping short of the bottom so the loaf stays intact. Melt 4 tablespoons butter with 1 tablespoon olive oil; add 2 to 3 minced garlic cloves and 1/2 teaspoon salt and cook, stirring, 2 minutes. Stir in 2 tablespoons chopped parsley. Spread the garlic mixture between the bread slices; wrap in foil and bake at 375 degrees F, 15 minutes. Unwrap and bake until crisp, 5 more minutes.
Photograph by Antonis Achilleos
Recipe courtesy of Food Network Magazine

how to make Herbed Garlic Bread

Cook: period
Total Time: 20 min
Prep: 5 min 15 min

Yield: 1 loafHerbed Garlic Bread
Level: Easy
Ingredients
Directions
Preheat oven to 350 degrees F.


For the bread, stir together the butter, mashed garlic, and herbs in a small
bowl and season with salt and pepper. Tear open the loaf of bread
lengthwise, spread the herb-garlic mixture over both halves and sprinkle with a little olive oil. Bake for 15 minutes.
Recipe courtesy of Tyler Florence

my monday project

how to make beaded flowers - beaded flowers for jewelry making:

my monday project thanks to nbeads

how to make beaded flowers - beaded flowers for jewelry making:

try this new Sausage” Rolls recipe

 
Venison "Sausage" Rolls 
Total Time: 1 hr 15 min
Prep: 30 min
Inactive: 20 min
Cook: 25 minYield: 8 servings of 2 appetizers eachLevel: Intermediate

Ingredients1/2 pound ground venison
1/2 pound ground pork

2 eggs
3 tablespoons freshly chopped parsley leaves
2 tablespoons freshly chopped fresh thyme leaves
1 tablespoon freshly chopped rosemary leaves
1 red onion, finely chopped
Salt and freshly ground black pepper
4 sheets puff pastry dough (often sold in 17 or 18-ounce packages containing 2 (9 or 10-inch) square sheets of puff pastry)
2 eggs, beaten for egg wash
Add Checked Items To Grocery ListDirections
Make “sausage” mixture by mixing venison, pork, eggs, parsley, thyme, rosemary, onion, and salt and pepper, to taste. Saute sausage mixture over medium-high heat on the stovetop until browned, using a wooden spoon to keep the texture of the mixture “fine” (not chunky) while cooking. Drain the meat mixture well and set aside to cool.
Preheat oven to 350 degrees F.
Roll out each puff pastry sheet and cut each of the 4 sheets into 4 squares, yielding 16 squares. (These will be 4 1/2 or 5-inch square.) Spread the “sausage” mixture, over the surface of each of the 16 squares and roll up the dough “jelly roll” style (so the cross-section of the roll will be a spiral design), seal dough on the ends by crimping, and place on a baking sheet. Bake until golden brown, approximately 15 minutes, until golden brown.

beading materials and there uses

Jennifer Jangles Blog: Stacked Ornaments Project and Making A Simple Wire Loop:

crativity craft fully activated

Tissue paper pom poms:

diy flower light hope decorators will love it

DIY flower lights... Link is in Spanish. Thankfully there are pictures. I would love to do this for my dorm room instead of using the dorm light that reminds me of being in an office.:

beaded crown check it out

tutorial for a bead crown! #beautiful great gift:

for the love of crativity thank me later

DIY Bead Roses Bouquet DIY Bead Roses Bouquet:

a white flawer so amazing

filter coffe#flowers:

craft elvolving

DIY Bead Fuchsia Flower:

i acctually paid 2000 naira equivelent to 8 usdollar but is free here

DIY Key Chain Beads Charm: just thank me when you are done

flawer crativity

DIY Beads Purple Flower:

flawer broch/ flawer pendant all lovelly

French beaded flower:

beading tools

great post that explains what you need different jewelry pliers for:

dont buy what you can easlly make

DIY necklace display:

my monday project thanks to nbeads

how to make beaded flowers - beaded flowers for jewelry making:

this is amazing

DIY Beaded Violet Flower Bouquet | iCreativeIdeas.com Like Us on Facebook ==> https://www.facebook.com/icreativeideas:

this project was lovelly hope you will love it

DIY Transparent Beads Bracelet:

i love this cuz it contains my favorite color

diagram:

just have fun with this

Beaded bracelet tutorial:

belive me this awesome unisex

DIY Beads Tile Bracelet:

hope you love this

Necklace from beads:

i stumbled on this so i deside to share it with you guyz

DIY Beaded Violet Flower Bouquet | iCreativeIdeas.com Like Us on Facebook ==> https://www.facebook.com/icreativeideas:

this is amazing but i am yet to reinterprite it to text and video

Kołnierz "Petersburg"  1/4:

you can do this

Beautiful Pearl Necklace M Wonderful DIY Beautiful Pearl Necklace:

this is what i gut via inbox and i deside to share it with you guyz

Free Tutorial on How to Make a Chunk Orchid Pearl Flower Necklace:

if you are are a beader just start with this simple but expensive and nice

tutorial. #Bead: you can archive this with different bead but it will give you different result

i belive you will like this

How to Make a Champagne Wave Bracelet with Pearls for Wedding:

just giving this out becousse i belive you deserve it

a Green Pearl Bead Bracelet:

thank me later

Free pattern for earrings Berry Juice - 2:

this is really awsome just thank me when you gut it

blue beaded cuff bracelet:

this on will blow your mind, just thank me later

7 layer bracelet tutorial:

thank me later mode

7 layer bracelet tutorial:

thank me later

Free pattern for earrings Berry Juice - 2: Создаем серьги в технике бисероплетения / Beadweaved Earrings Tutorial:

thank me later

Free pattern for necklace Ameli | Beads Magic:

thank me later


Blue Star bracelet made with twin beads:

this is what pro beaders did not want to tell you

have you ever wondered why pro bearers will never expose there beading patterns, well we have exploited some patterns just to fulfill your desire and explode for greatness just practice with patience and relaxed mind, believe me you will get it right.

hope you enjoyed it

learn how to homemade Adire

Nigerian Adire Cloth | 3 Ways to make it at home with paper & cloth

Adire is a traditional method of resist dyeing white cloth in indigo used by the Yoruba in Nigeria. The word adire translates as tie & dye, and it's thought the earliest form would have been simple tied designs on woven cloth. In the early decades of the 20th century, new access to large quantities of European imported factory produced cotton shirting gave rise to new designs and techniques - like cassava paste resist. 


Adire Oniko - the midle cloth has three baskets indicating money, education and power.
Photo Credit: Eugene Kim (CC
)

Adire was traditionally made by women. Designs are created by "painting" or tying the cloth - these areas keep out the dye. The cloth is then dipped in the large earthenware indigo dye pots, partially sunk into the ground, multiple times to get a dark color. 


Indigo dye pitsPhoto Credit: Eugene Kim (CC)

To make the indigo dye, indigo leaves are pounded and mixed with water and ashes (made by burning cocoa pods). This mixture is left to ferment in the sun for 7 to 10 days to turn blue and become a dye.


There are several methods of resist: 

  • Adire oniko is made by tying seeds or rocks with raffia
  • Adire eleko is made by painting with cassava paste and a chicken feather or with a metal stencil
  • Adire alabare is made by folding and stitching patterns with cotton thread
  • More recently, adire eleko is commonly made with wax, similarly to batik


Adire was an everyday cloth worn as a wrapper on women, and though it was produced until the 70s, it was most fashionable in the late 30s with different patterns highly requested from one year to the next. It was considered a dying tradition, though in the past decade or so a famous Nigerian artist & chief has revitalized it by offering free workshops & courses in centres opened to preserve and update this, and other, traditional arts. 


Watch a great 2 min introductory video of modern day artisans creating adire cloth in its different forms 
 

This adire cloth was made using a stencil over the fabric, and filling in the openings with cassava paste.
Find this, and other examples of adire cloth at Hamill Tribal Textiles

3 Ways to Make "Adire" at Home

For inspiration to use in the following projects, find examples of adire here and here. And you can find a great chart of different adire patterns and their meanings here.

Paper Adire Eleko

Our other West African textile crafts so far have been with paper, so I wanted us to try these out with cloth. But I wanted to include a paper version for anyone who wants a quicker activity. I immediately thought of our Miao Batik inspired crayon resist, which is similar. Then I came across the following paper project inspired by Adire Eleko, and loved the idea of getting a darker, indigo like color.


Inspired by this post at Create Art with Me, this paper adire eleko was made with blue cardstock, white oil pastel crayon, and brushing over the design with a wash of watered down blue acrylic paint* and a drop of black india ink. A design is drawn in grids with adire inspired drawings before being brushed in "indigo".
*the original post uses blue liquid watercolor but I didn't have any on hand

Cloth Adire Eleko


The girls had a lot of fun with this, and want to try it again for other projects with different colored paint. This does take a few days - first the paste has to dry, then the fabric paint has to set. It's a project done in phases. We also learned a few things based on our mistakes and experimenting! We made our own "cassava" paste with all purpose flour and water, made designs over cotton with a squeeze bottle and when dry painted over it with slightly watered down fabric paint.

What you'll need:
  • flour & water
  • squeeze bottle
  • piece of white cotton
  • dark blue fabric paint
  • paintbrush
  • something waterproof to protect your work surface
First make your paste by starting off with 1/2 cup of flour and 1/2 cup of water.Whisk and try to get as many lumps out. Fill a squeeze bottle with it.
*Running it through a sieve could ensure no lumps are in the paste
*Don't double the recipe - you'll end up with more lumps than paste, get frustrated trying to whisk them out, use it anyways and have very frustrated kids because you gave them a bottle with lumpy paste. And it might cause issues with final result... 


First create grids with your paste. Then have fun "drawing" designs with the paste. As long as the paste isn't lumpy and getting caught in the spout, your kids will really enjoy this :)

Let the paste dry - it didn't take that long to dry enough to paint over it, for us about an hour. We could tell it wasn't completely dry inside, but the outer edges "attaching" the paste to the fabric was good and hard. It would certainly be dry if left overnight.


Once the paste is dry, paint the entire piece with fabric paint that has a tiny bit of water in it. 
*try to avoid "cracking" the dried up paste by pushing down on it or the paint will seep into the cracks, giving it a batik look. 
*keep track of your ratio of water to paint so you can make a second batch should you run out.
*We did have a piece that was done with paint that was too watered down and it came out quite light.

Remove the paste
Wait until the fabric paint has dried and set for the time suggested on the bottle. There are two ways of removing the paste. You can just pick it off - our pieces were rather large, and it was a lot of paste to remove. Pea did it that way anyways because she liked the process :) It's easier and quicker to pick off if it gets a quick soak in hot water (3-4 minutes). Any longer than that in the hot water, and you're removing the paste the second way - rubbing off soaked and soft flour paste. In this way, rub the cloth together rinsing it regularly with warm to hot water. When most of it is removed, throw it in the wash (on a long cycle). 
*Do be sure to follow the paint instructions - 48 hours may seem long, but not as long as the required 72 hours and some of the color will wash off.  

Dry and iron it and you've got your own Adire Eleko!


Cloth Adire Oniko

I've been wanting to play with indigo dye for some time so when I read about adire, I immediately ordered an indigo dye kit. It created fantastic results we are all pleased with. I recommend this project for when it's warm enough to be outside - the dye has an incredibly foul smell (though washes out in the fabric, thank goodness) and your husband may well be displeased the whole house smells like sewage... your enthusiasm for the project might not be contagious.


What you'll need:
  • Jacquard Indigo Tie Dye Kit (Mini) (affiliate link) or any indigo tie dye kit - these come with the ash that needs to be combined with the indigo powder, as well as very useful instructions
  • white cotton fabric
  • twine or cording
  • beans (we used regular baking navy beans)
  • a large bucket with a lid for the dye bath
This is pretty straightforward, and most importantly follow the directions in the indigo kit. The mixture will have to sit for a minimum of an hour, and if kept covered, can be used for several days afterwards. I recommend setting up the dye in your bucket, and while it's setting, start tying your cloth.


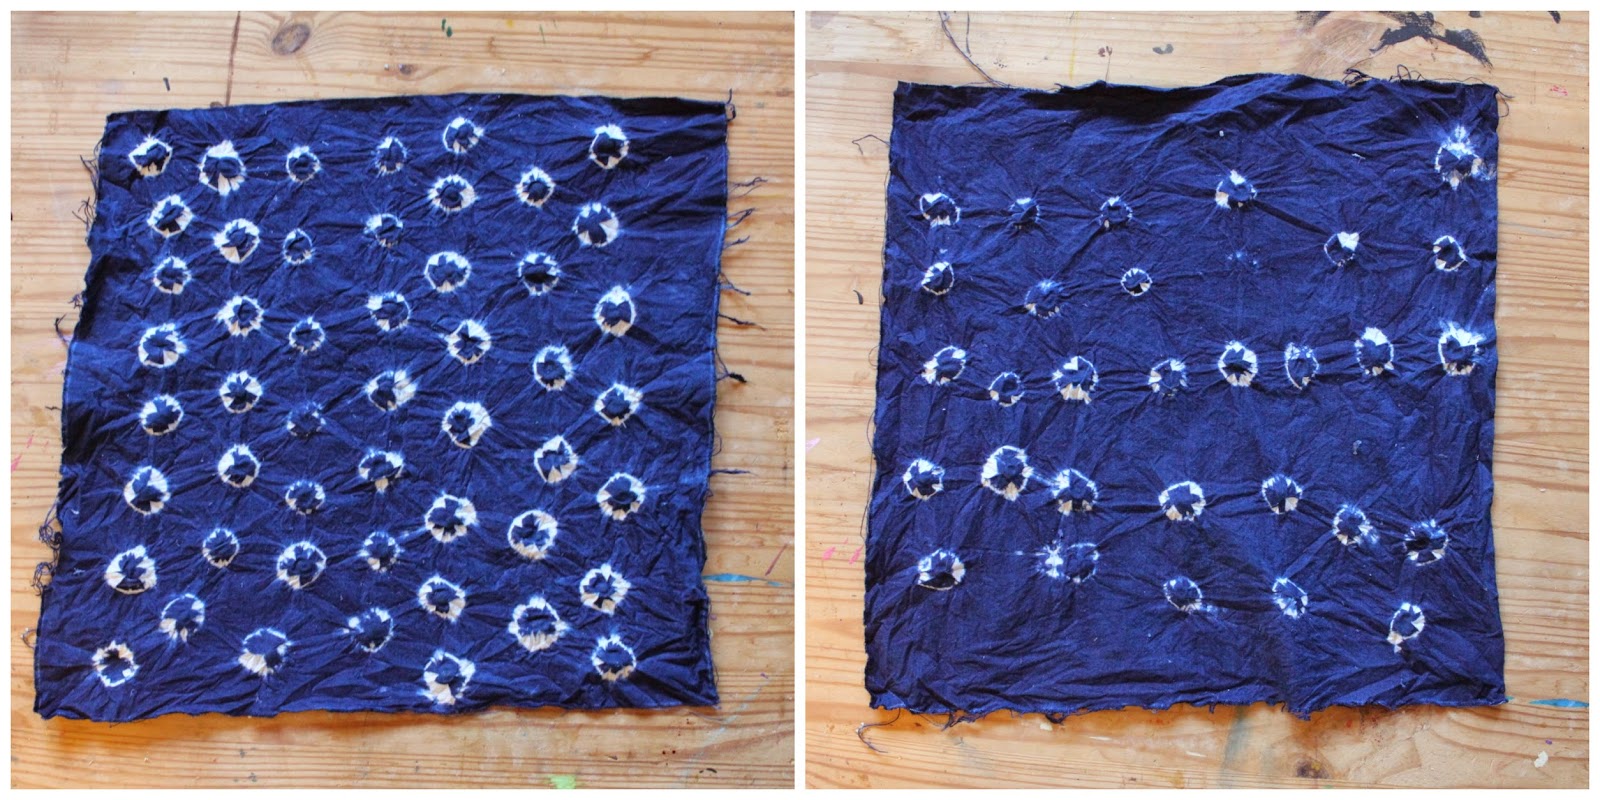
Starting in the center of your cloth, place a bean, then pinch it and tie it tightly - the part of the cloth that is under the twine will resist the dye. This may take a few tries to get the hang of, but soon it'll be easy. Continue with lots of beans - Pea and I did ours methodically in rows, whereas Elle had a more random pattern. 

When you're ready to dye the cloth, follow the directions in the  kit. Essentially, you soak the fabric and place it in the dye being careful not to disturb it so as not to introduce oxygen in it. We kept our fabric in it for 2 minutes, set it aside for 20 minutes and then dyed them a second time for another 2 minutes. 
*I recommend purchasing longer gloves - while holding the fabric in the dye, some seeped into the cuff of the provided gloves and I had blue hands for days (the girls were oh so happy that didn't happen to them!)
*The cloth comes out looking green, but gradually turns indigo as it's exposed to oxygen (a fun chemistry lesson).

Let dry, then rinse and let dry again. Cut off or untie the strings, remove the beans and wash (on its own). Once clean and dry, iron and admire!


Reelated post